
Groktz Dwarfstompa vs. WOC
Overview
Scenario: Blood and Glory
Location: Gamers Haven Colorado Springs, CO
Date played: Saturday, December 01, 2012
Groktz Dwarfstompa
General: Derick
-
Lord
-
SGS Savage Orc Great Shaman, SO Great Shaman290 points
-
Hero
-
NGS Night Goblin Shaman, NG Shaman110 points
-
BSB Goblin Big Boss (Battle Standard Bearer), Goblin Big Boss153 points
-
BBB Black Orc Big Boss, BO Big Boss90 points
-
Core
-
SO 33 Savage Orc Big'Uns, SO Boyz Mob+ Musician, Standard383 points
-
NG 41 Night Goblins, Night Goblin Mob+ Standard178 points
-
WR1 5 Goblin Wolf Riders, Wolf Rider Mob50 points
-
WR2 5 Goblin Wolf Riders, Wolf Rider Mob50 points
-
Special
-
SH1 40 Night Goblin Squig Herd, Squig Herd 130 Squigs, 10 Herders270 points
-
SH2 40 Night Goblin Squig Herd, Squig Herd 230 Squigs, 10 Herders270 points
-
T1 Trolls35 points
-
T2 Trolls35 points
-
T3 Trolls35 points
-
Rare
-
MS11 Mangler Squig65 points
-
MS22 Mangler Squig65 points
-
PW Snotling Pump Wagon, Pump Wagon75 points
-
DD11 Goblin Doom Diver Catapult, Doom Diver 180 points
-
DD2 Goblin Doom Diver Catapult, Doom Diver 280 points
-
RL3 Goblin Rock Lobber85 points
-
Total: 2399 points
WOC
General: Mike
-
Lord
-
SLoT Sorcerer Lord of Tzeentch290 points
-
Hero
-
EHoKB Exalted Hero of Tzeentch(Battle Standard Bearer) + halberd, shield150 points
-
Core
-
CM11 20 Chaos Marauders of Khorne130 points
-
CM22 20 Chaos Marauders of Khorne130 points
-
CWN 24 Chaos Warriors of Nurgle+ Standard426 points
-
CWK 24 Chaos Warriors of Khorne+ Standard426 points
-
Special
-
CK 15 Chosen of Khorne315 points
-
Rare
-
W Chaos Warshrine of Tzeentch130 points
-
SK 6 Skullcrushers360 points
-
Total: 2357 points
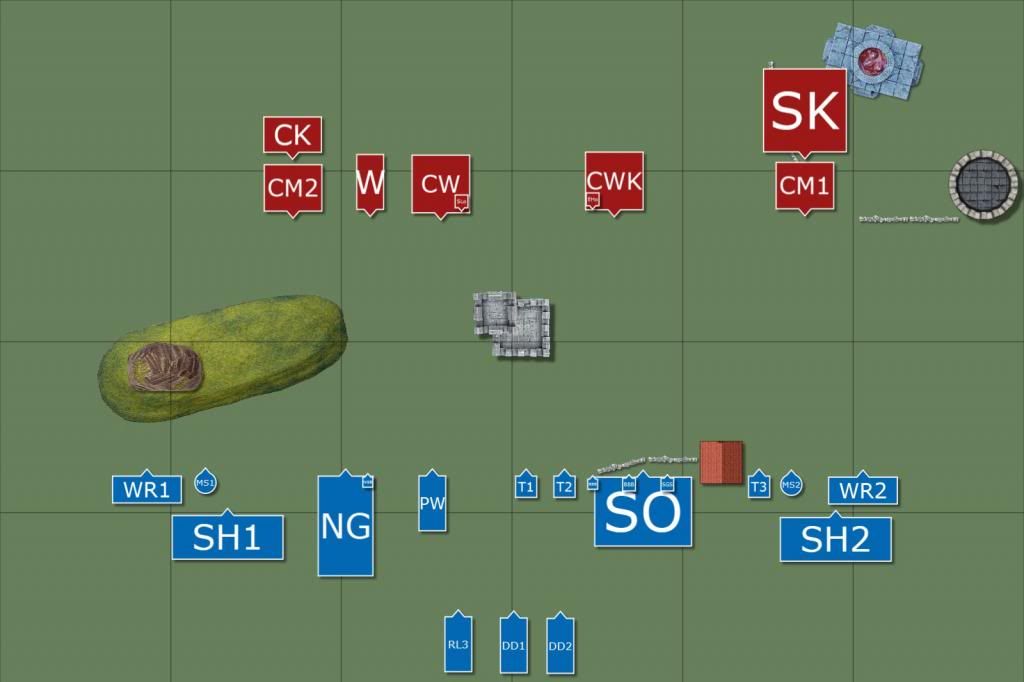
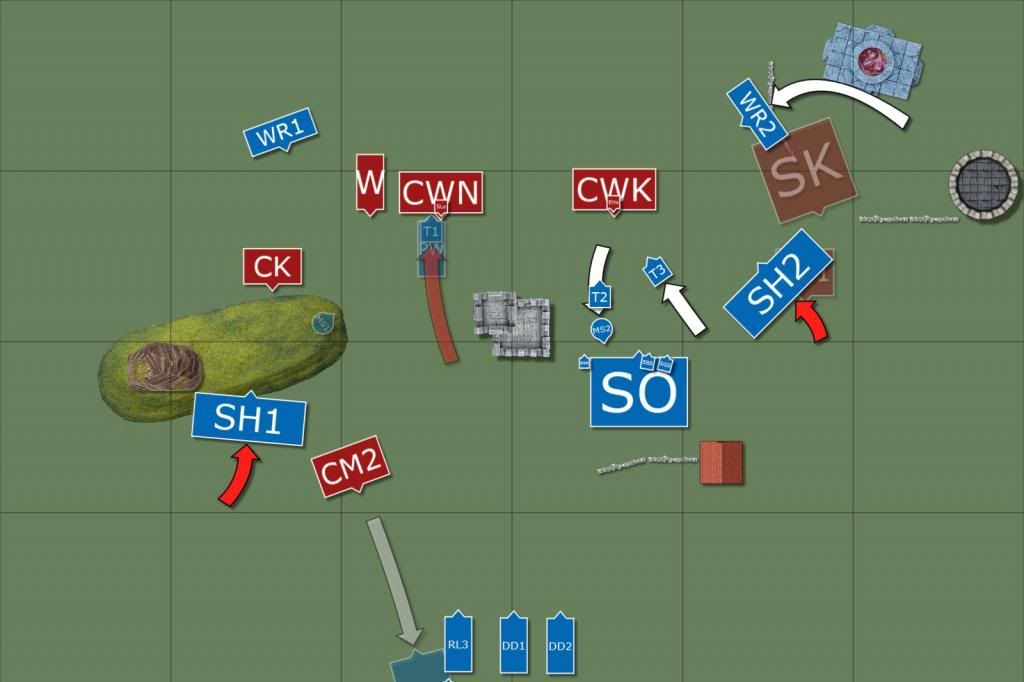
Deployment
Before Start of Turn
Spells:
SO Great Shaman:
Fists of Gork, Hand of Gork, 'Ere We Go!, and Foot of Gork.
NG Shaman:
Sneaky Stabbin', and Gift of the Spider-god, really needed Itchy Nuisance.
Chaos Sorc:
Flickering Fire of Tzeentch, Pandaemonium, Treason of Tzeentch, and Call to Glory.
Vanguard:
Both Wolf rider units were able to vanguard to set up flank charges.
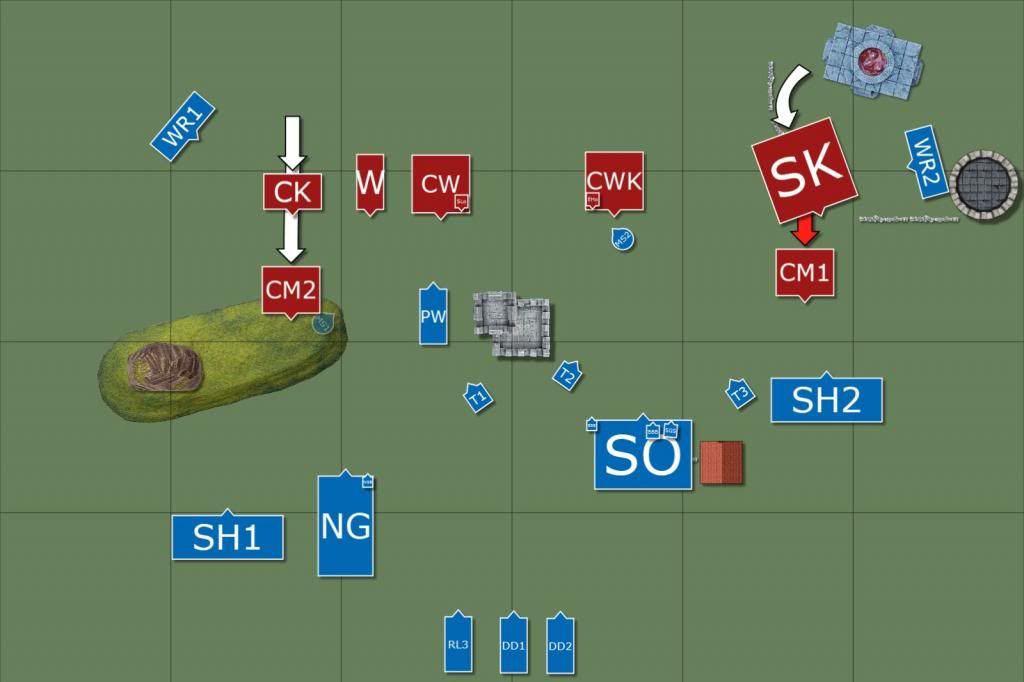
Turn 1 - Groktz Dwarfstompa

Orcs - Turn 1
Movement:
Animosity: Both NG, and SH1 both failed and Squabbled. SO also failed but the BO stopped that quick, only killing off 1 SO. The wolf riders marched to set up flank charges. All others moved forward as normal. The MS1 rolled pretty poorly and ended up right in front of the marauders...
Magic: Rolled average for the winds, hand of Gorked MS2 right in front of CWK. Tried to cast Foot of Gork on 5 dice on an 18+, came out to a 15 with my level, pretty poor dice.
Shooting:
I was pretty scared of his Skullcrushers, so I decided to send both doom divers at them inflicting 6 wounds taking 3 skull crushers off. I continued with the rock lobber on the Warshrine, rolling the third direct hit in a row, wounded, he failed his ward save, and I rolled a 1 for multiple wounds T_T.
Combat:
None
Turn 1 - WOC
WOC - Turn 1
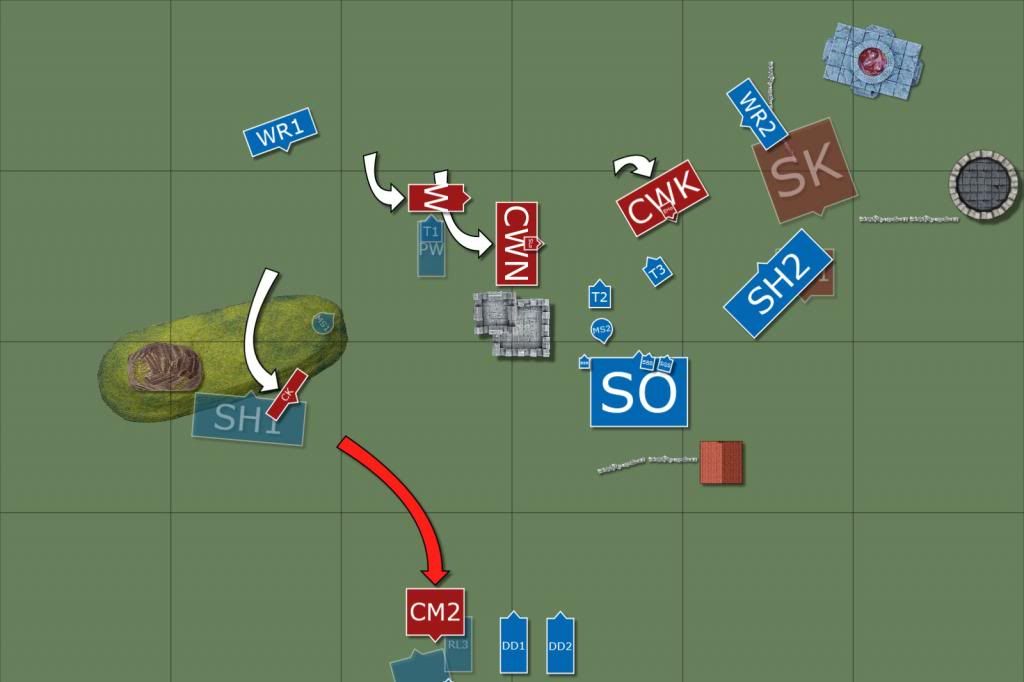
Movement:
Charges: CM1 charged SH2 but failed.
He moved CM2, like I predicted into MS1 killing it but inflicting 9 wounds.
Magic:
He rolled pretty poorly for winds of magic and casted Pandaemonium, which I let pass because I needed dice to stop his Flickering Fire on MS2 which was dispelled easily.
Shooting: Warshrine casted the buff which causes Fear.
Combat:
None
Turn 2 - Groktz Dwarfstompa
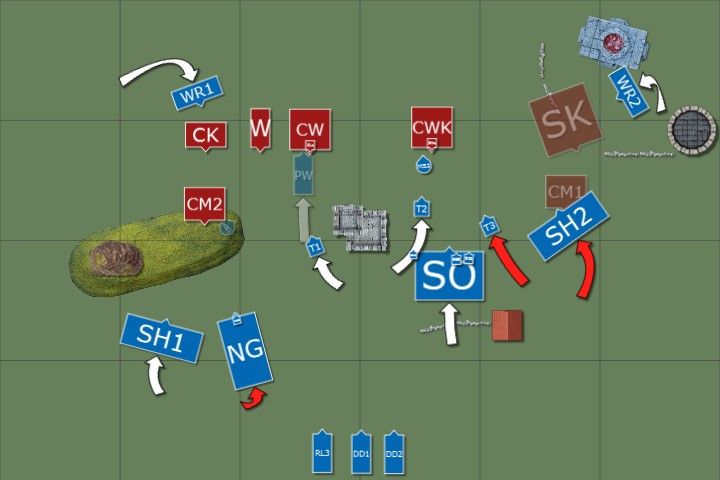
Orcs - Turn 2
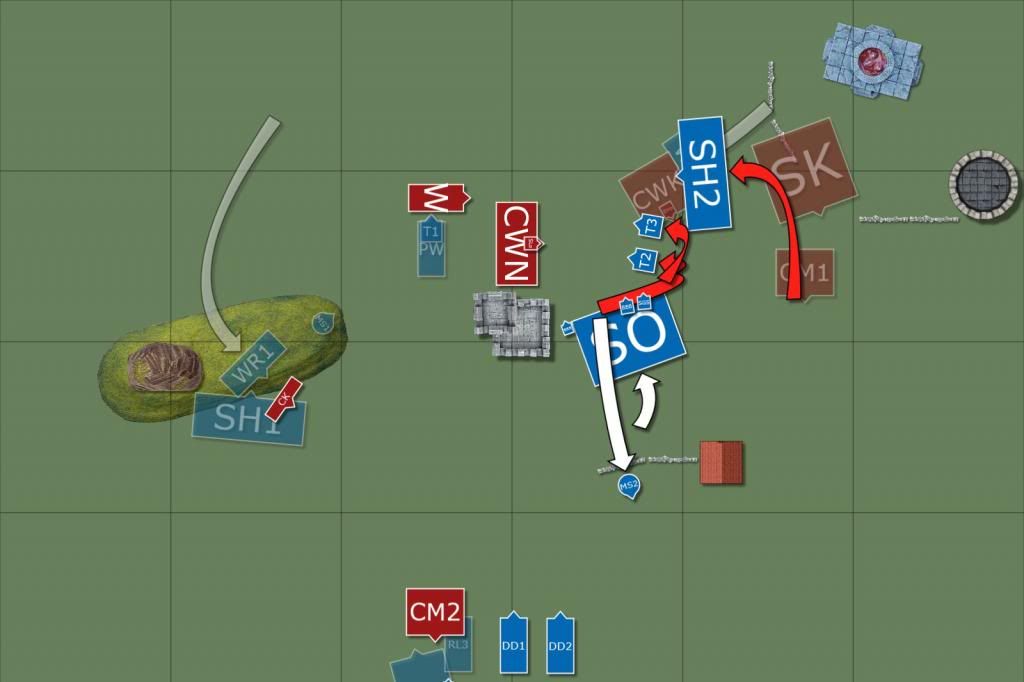
Movement:
Animosity: none
Charges: NG charged CM2 but failed, SH2 charged CM1, T3 but failed its stupidity roll because of pandaemonium charged CWK.
MS2 moved through the CWK killing 8, the PW killed 5 with impact hits.
Magic:
Rolled really well for winds here but made a pretty big mistake. I started out with casting Hand of Gork on MS2 to move him back in front of CWK. Here is where two big mistakes. I forgot to dispel Pandaemonium which made me miscast, I lost a level and lost Hand of Gork. In hindsight I shouldn't have moved the mangler back in front of my units forgetting that his movement is random now.
I casted Foot of Gork on 6 dice on 18+ stomping on CWK, killing 7, Gork was smiling and continued and stomped on the Skull Crushers, killing one, Gork wasn't pleased with that result and decided to stomp on them again killing all of them. Still not being pleased, Gork decided to return to the CWK unit killing 6 before he decided to take a break.
Shooting:
Gork or Mork who ever likes shooting more decided to bless my scatter dice. Landing two direct hits with the doom divers, killing from both CW and CWK. The rock lobber hit the warshrine again but I rolled a 1 to wound T_T.
Combat:
PW got slaughtered, which I knew would happen. Now came to the units I built this list for and wanted to test out, the Squig Herders. SH2 went first in the combat because the marauders had Great Weapons. The Squigs alone inflicted over 25 wounds slaying the unit out right.
At this point I was really confident in my army to handle the rest of the WOC, however I should have known better.
Turn 2 - WOC
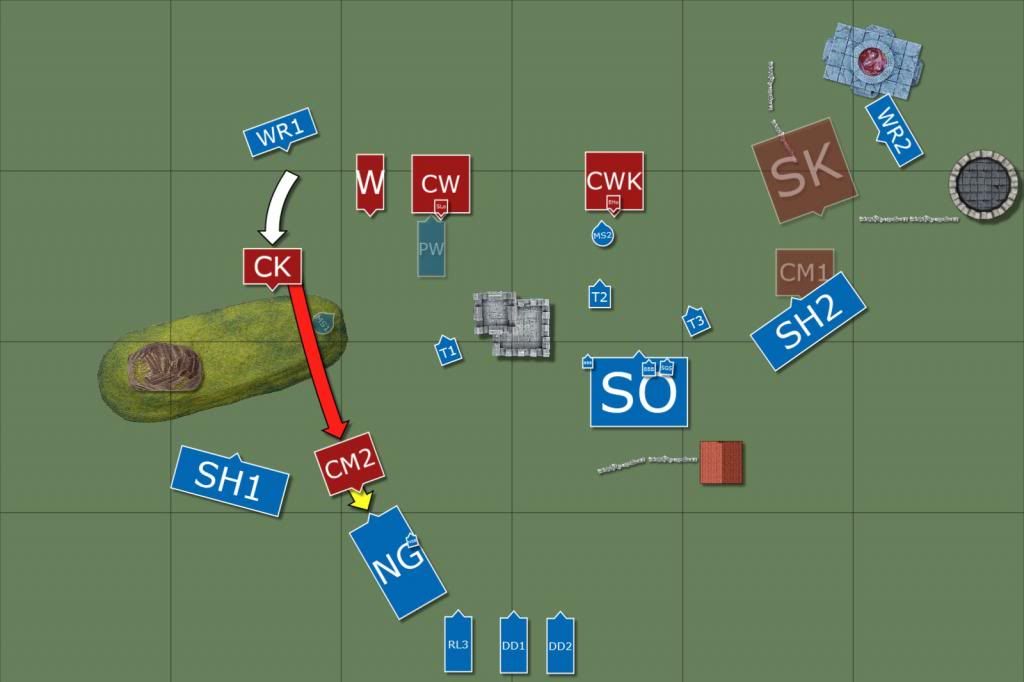
WOC - Turn 2
Movement:
The 13 or so marauder (CM2) charged the NG and moved CK to prepare for the charge.
Magic:
Rolled pretty well here, I was pretty outnumbered with dice. Again I let Panaemonium go, let flickering go, and stopped Call to Glory.
Shooting:
His warshrine buffed his CW unit with +1 toughness.
Combat:
The NG struck first due to GW on the Marauders. Rolled for nets... and decided it would be a good idea if I netted myself. I was only able to kill 3 marauders, which in turn he clobbered my goblins. Luckily I was steadfast; however I was outside of my leadership bubble and had to pass a LD test on a 5... Lets just say I failed it miserably. Fleeing from combat, luckily getting away, losing a standard and Dropping down to 5 Fortitude.
Turn 3 - Groktz Dwarfstompa
Orcs - Turn 3
Movement:
Animosity: none
Charges: SH1 charged CK, SH2 Charged CWK, both failed and T1 charged the CW unit. :P
Couldn't rally the NG unit, which proceeded to flee from the table right through my warmachines causing both RL3, and DD1 to cower behind their war machines. MS2 scattered right through T2 causing 5 wounds and somehow I saved 4 of them. This screwed me here halting my advance with my SO unit.
Magic: Rolled pretty poorly and dispelled Pandaemonium, tried to cask foot of Gork again but failed.
Shooting:
The DD2 tried to shoot the Warshrine managed to misfire and threw a random shot right across the face of the marauders, just couldn’t imagine what they were thinking when a goblin with wings flew past them on the horizon and smashing into a pulp in front of them.
Combat:
As expected the Troll got diced up pretty badly.
Turn 3 - WOC
WOC - Turn 3
Movement:
CK charged SH1, CM2 charged the RL, both making it.
He decided to reform to protect his left flank and prepare for my SO.
Magic:
He rolled really high for Pandaemonium and I had to throw all 4 dispel dice at it to stop it which opened up him to use the remaining dice on Flame killing 4 squigs and 2 herders. He also got off, Call to Glory and placed a new Hero in CWK
Shooting:
His warshrine did something, but nothing relevant.
Combat:
The chosen decided to go on a killing spree killing 17 Squigs, fighting back the Squigs were able to return and kill 9 of them. The squigs being outside the bubble failed their break test causing them to explode killing 2 more chosen. CM2 killed the Rock lobber and running off the table. Causing both Doom Diver units to panic and hide again.
Turn 4 - Groktz Dwarfstompa
Orcs - Turn 4
Movement:
Animosity: WR2 failed their test charging into CWK
Charges: Both T2 and T3 charged, also Charged. WR1 charged the CK for a hope of a miracle.
MS2 moved through my SO killing 3 and taking a wound from the fence. I prepared the SO to charge and move around the tower.
Magic: Rolled poorly for magic here and decided not to tempt a miscast and decided to not do anything.
Shooting:
None
Combat:
I was pretty nervous here with the high initiative after what happened to my other herd unit vs. the chosen. The warriors went first killing off the wolves with ease, the rest of the attacks including the 2 exalted heroes carved their way through my herders killing 18. At this point it was my turn. The two trolls decided to vomit on the BSB melting him in his armor. The Herders decided tear apart the warrior units leaving only the other hero alive which the rest of the attacks penetrated his armor slaying him. No luck for WR1 as they were made into puppy stew.
Turn 4 - WOC

WOC - Turn 4
Movement:
The WOC prepared for the charge by moving back to try and survive one more turn.
Magic:
Cast flickering flame, on t2 melting it in a boiling mess. Tried to cast Pandaemonium which I dispelled. Then cast Call to Glory adding another Hero into CW.
Shooting:
None
Combat:
None
Movement:
The WOC prepared for the charge by moving back to try and survive one more turn.
Magic:
Cast flickering flame, on t2 melting it in a boiling mess. Tried to cast Pandaemonium which I dispelled. Then cast Call to Glory adding another Hero into CW.
Shooting:
None
Combat:
None
Turn 5 - Groktz Dwarfstompa

Orcs - Turn 5
Movement:
Animosity: none
Charges: T3 charges CW, which he fails, which in hindsight really saved me here.
Magic:
Rolled 3-2 and threw all my dice at Foot of Gork on a 18+ getting it on a 27 w/o a miscast. Gork decided he was done being lazy and came out stomping on CW twice killing all except one Chaos Warrior and Exalted Hero. At this point his army broke below three fortitude ending the game.
Overall good game and a win for the Boyz, I made some mistakes but that is the point of writing these reports to see what I could do better and get opinions on what I could have done better and what I did well.

The Report is Copyright (c) 2009 Derick. All rights reserved.
The Report by Derick is licensed under a Creative Commons Attribution-Non-Commercial-No Derivative Works 3.0 Unported License.
The Report by Derick is licensed under a Creative Commons Attribution-Non-Commercial-No Derivative Works 3.0 Unported License.
This document is completely unofficial and in no way endorsed by Games Workshop Limited.
Chaos, the Chaos device, the Chaos logo, Citadel, Citadel Device, Darkblade, the Double-Headed/Imperial Eagle device, 'Eavy Metal, Forge World, Games Workshop, Games Workshop logo, Golden Demon, Great Unclean One, GW, the Hammer of Sigmar logo, Horned Rat logo, Keeper of Secrets, Khemri, Khorne, the Khorne logo, Lord of Change, Nurgle, the Nurgle logo, Skaven, the Skaven symbol devices, Slaanesh, the Slaanesh logo, Tomb Kings, Trio of Warriors, Twin Tailed Comet Logo, Tzeentch, the Tzeentch logo, Warhammer, Warhammer Online, Warhammer World logo, White Dwarf, the White Dwarf logo, and all associated marks, names, races, race insignia, characters, vehicles, locations, units, illustrations and images from the Warhammer world are either (r), TM and/or (c) Copyright Games Workshop Ltd 2000-2007, variably registered in the UK and other countries around the world. Used without permission. No challenge to their status intended. All Rights Reserved to their respective owners.
Component (c) Tom Wright 2010. All rights reserved.
Component by Tom Wright is licensed under a Creative Commons Attribution-Non-Commercial-Share Alike 3.0 Unported License.
Component by Tom Wright is licensed under a Creative Commons Attribution-Non-Commercial-Share Alike 3.0 Unported License.
Component (c) 2009 Marijn Bierhof. All rights reserved.
Component (c) DeeDee 2009. All rights reserved.
Component by DeeDee is licensed under a Creative Commons Attribution-Non-Commercial-Share Alike 3.0 Unported License.
Component by DeeDee is licensed under a Creative Commons Attribution-Non-Commercial-Share Alike 3.0 Unported License.
Model made with bricks from a Hirst Arts Fantasy Architecture mold.
Component (c) Tom Wright 2009. All rights reserved.
Component by Tom Wright is licensed under a Creative Commons Attribution-Non-Commercial-Share Alike 3.0 Unported License.
Component by Tom Wright is licensed under a Creative Commons Attribution-Non-Commercial-Share Alike 3.0 Unported License.
An Item in an image (c) Games Workshop PLC 2009. All rights reserved. Used without permission

Hey good game mate, for me the big one to take away is how you shift that leadership bubble around with your general and the BSB. I'm a huge fan of using a bunker with a BSB with Standard of Discipline. This allows you to move your bubble around and keep the general out of trouble. In my mind there's no point having tarpits if you can't guarantee they can use the General's leadership.
ReplyDeleteCheers. Sneaky Gobbo
That's a good point, I'm debating about getting rid of the tarpit all together and just adding more chaf and adding more numbers to my other units.
DeleteGreat write up, and I liked the maps as well. This is starting to get me into Warhammer Fantasy... my wallet can't take any more!
ReplyDeleteHey thank you! Its a great game should definitely save up and get into it.
ReplyDelete